Technician Workflow
You’re the heart of the repair operation. Your job is to diagnose devices accurately, execute repairs efficiently, and document everything. This guide walks you through your daily workflow — from receiving assignments to handing off to QC.
Your Key Responsibilities
Section titled “Your Key Responsibilities”- Queue Management: Review assigned work, prioritize by deadline
- Diagnostics: Test devices, identify issues, document findings
- Repair Logging: Record all work, parts used, and time spent
- Parts Tracking: Request parts, manage inventory, track usage
- Time Management: Clock in/out, log hours, track efficiency
- Handoff: Prepare devices for QC review
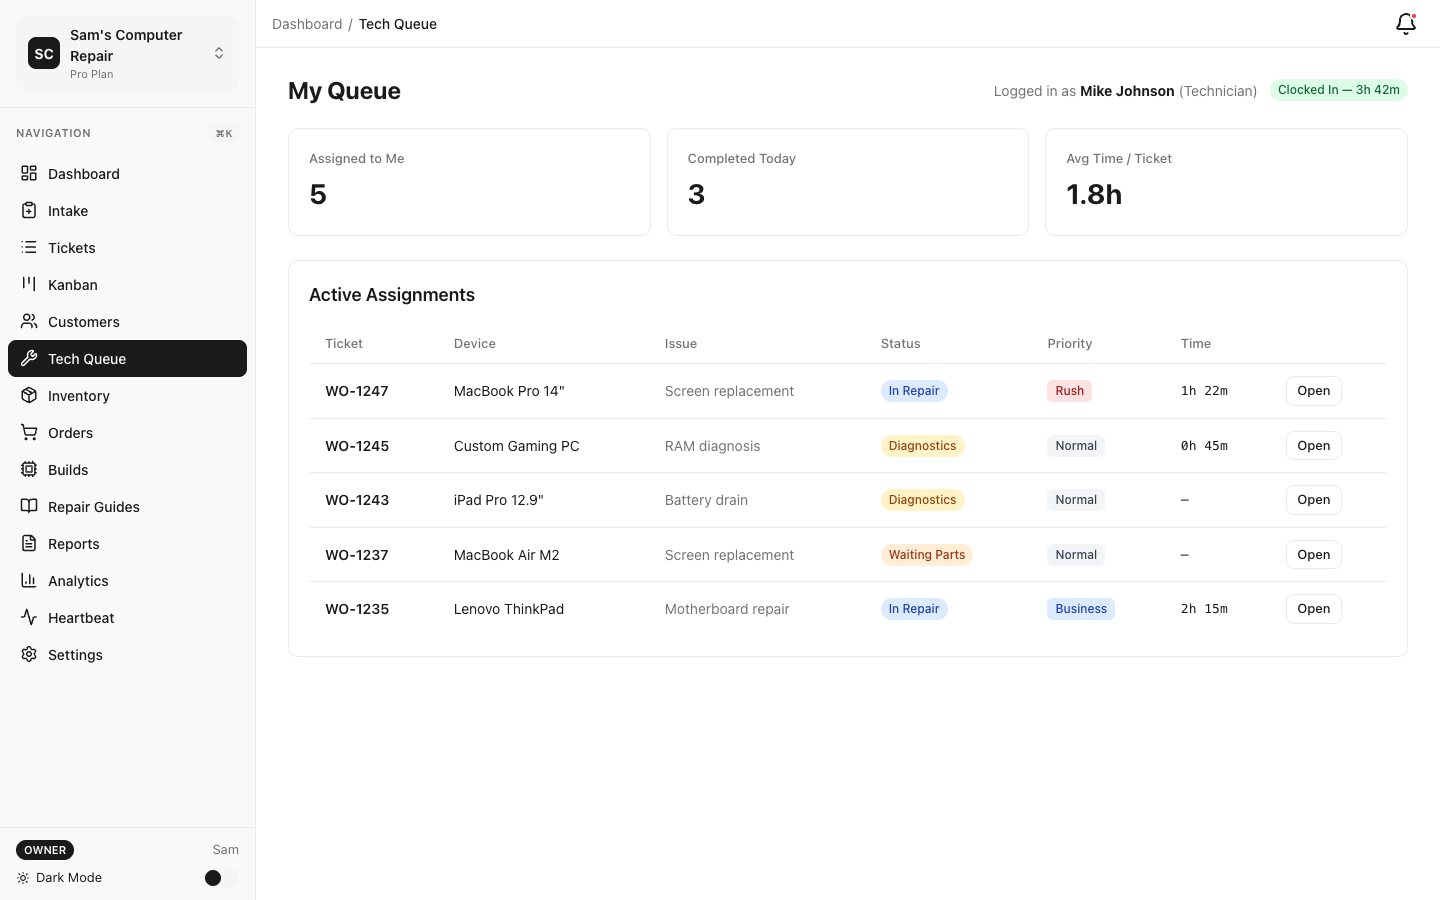
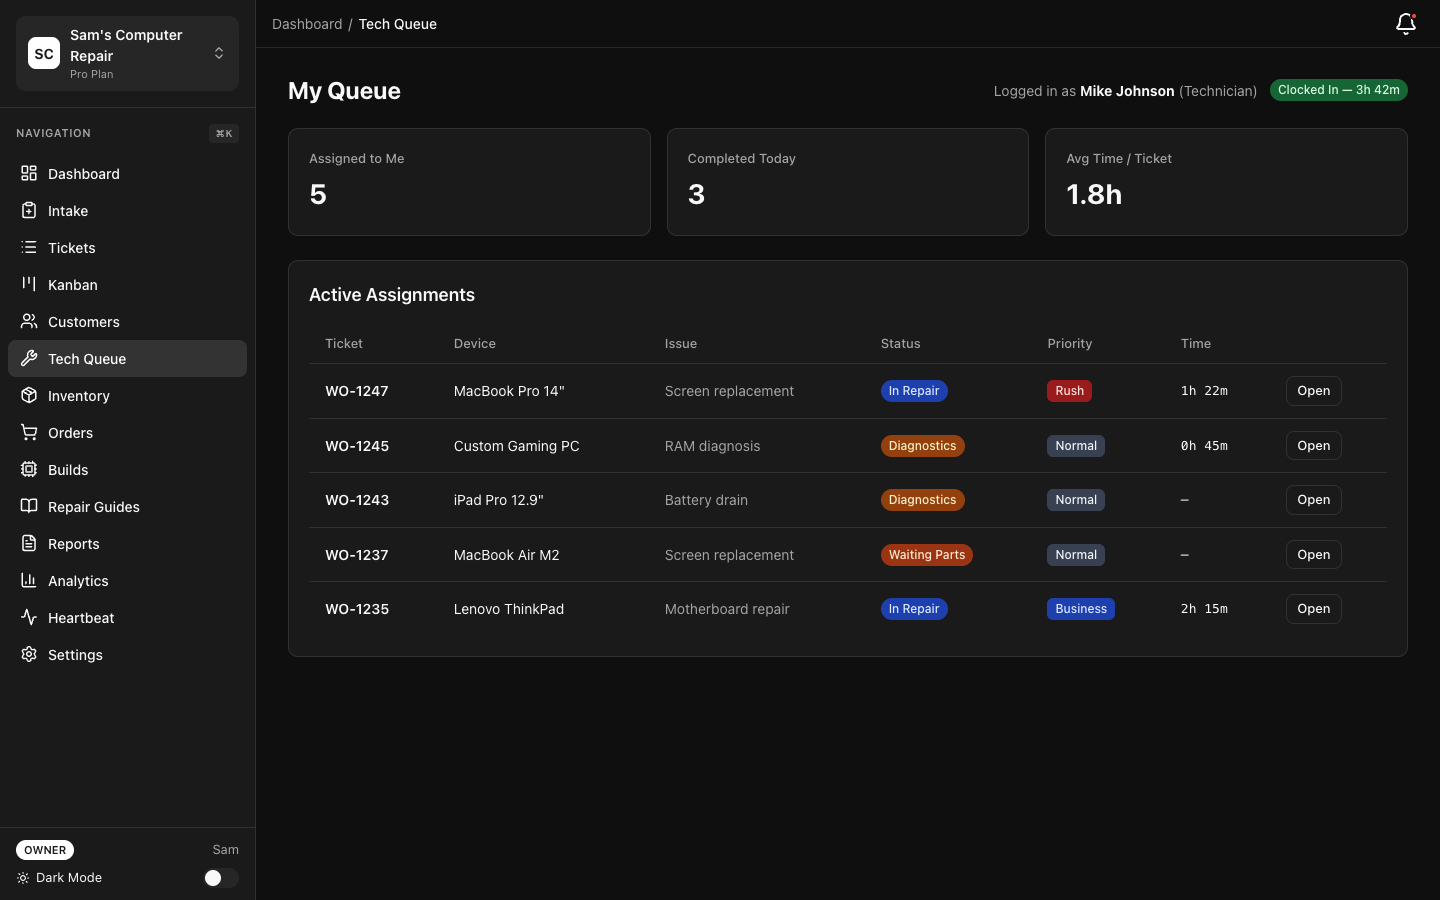
My Queue: Reviewing Your Daily Work
Section titled “My Queue: Reviewing Your Daily Work”Your queue is personalized — it shows only tickets assigned to you.
Accessing Your Queue
Section titled “Accessing Your Queue”- Log in and go to Dashboard
- Click “My Queue” (left sidebar)
- Or click the assignment icon with your name
Understanding Your Queue
Section titled “Understanding Your Queue”You’ll see:
| Column | What It Means |
|---|---|
| Ticket # | Unique repair ID (e.g., #REP-042) |
| Device | What’s being repaired (iPhone 14, Dell Laptop, etc.) |
| Issue | Customer’s description (Cracked screen, Won’t boot) |
| Status | Current workflow stage (DIAGNOSTICS, IN_REPAIR, etc.) |
| Time in Queue | How long this ticket has been assigned to you |
| Priority | Normal, High, or Urgent (set by manager) |
| Assigned By | Who assigned you this work |
Work Through Your Queue
Section titled “Work Through Your Queue”Priority order:
- High/Urgent tickets first (fastest turnaround, high-value devices)
- Oldest tickets next (been waiting longest)
- Routine repairs last (standard, low-pressure items)
Each morning:
- Open your queue
- Identify 3-5 tickets you’ll complete today
- Move them to “In Progress” (tells manager you’re working on them)
- Close completed ones at day’s end
Tip: Focus on one device at a time. Multi-tasking in repairs leads to forgotten steps and mistakes. Complete one, mark it done, grab the next.
Diagnostics: Investigating the Issue
Section titled “Diagnostics: Investigating the Issue”Diagnostics is your chance to understand what’s wrong. This phase is crucial — accurate diagnosis leads to accurate quotes, happy customers, and fewer reworks.
Step 1: Open the Ticket
Section titled “Step 1: Open the Ticket”- Click the ticket from your queue
- Scroll to “Diagnostics” section
- Click “Start Diagnostics” (if not already started)
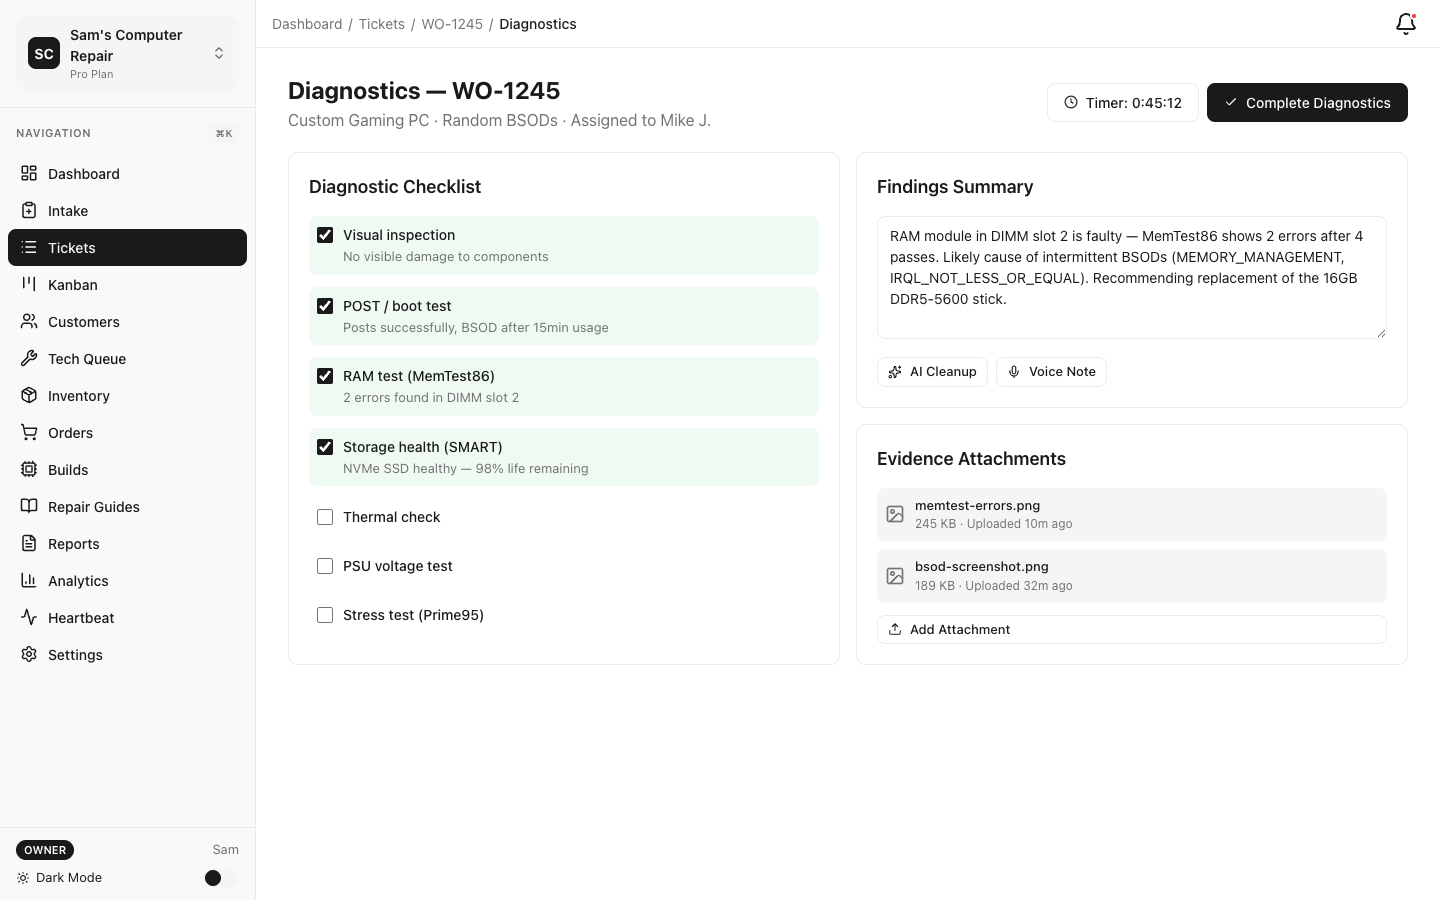
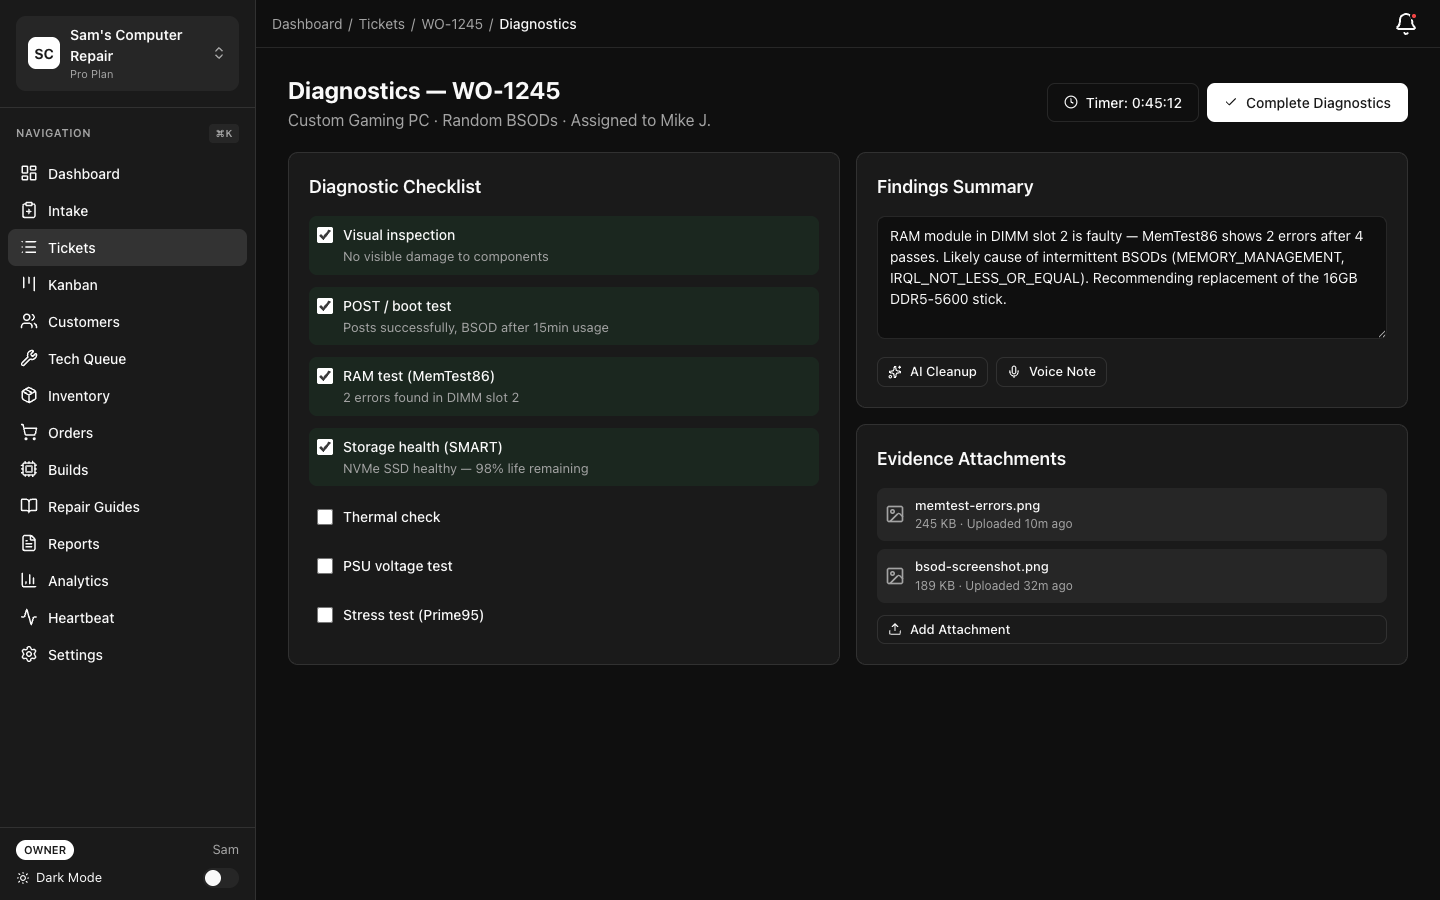
Step 2: Run the Diagnostic Checklist
Section titled “Step 2: Run the Diagnostic Checklist”Your shop has pre-built checklists (e.g., for phone screens, water damage, battery issues). Use them:
- Click “Load Diagnostic Template” (if available)
- Work through the checklist:
- Power on/off?
- Does the screen respond?
- Any physical damage?
- Any water damage signs?
- Buttons working?
- Speaker/mic clear?
- Check boxes as you verify each point
Why checklists? They ensure you don’t miss anything, and they’re legal protection. Customers see them, showing you were thorough.
Step 3: Document Your Findings
Section titled “Step 3: Document Your Findings”In Plain Text:
- “Screen cracked with hairline fracture from bottom-right corner to edge. Device powers on, touchscreen is partially responsive but unreliable in damaged area. No other damage. Recommend screen replacement.”
Include:
- What’s broken (specific, not vague)
- What’s working (rules out related issues)
- Any warnings (e.g., “Water damage risk if opened without proper tools”)
- Estimated fix difficulty and timeline
Step 4: Upload Evidence (Photos & Attachments)
Section titled “Step 4: Upload Evidence (Photos & Attachments)”Photos are gold. They help managers build accurate quotes and protect you in disputes.
Best practices:
- Macro shot of the damage (closeup showing cracks, water marks, etc.)
- Wide shot of the whole device (context)
- Diagnostic results (if you have test equipment photos)
- Before/after (take after pictures too, if time allows)
Upload:
- Click “Add Attachment” or “Take Photo”
- Choose file or snap a photo with your phone
- Add a caption: “Cracked screen — bottom-right corner”
- Click “Upload”
Step 5: Provide a Summary
Section titled “Step 5: Provide a Summary”At the bottom, write a summary a manager (or customer) can understand:
Example: “iPhone 14 screen cracked from corner impact. Device functions normally but display is difficult to use in damaged area. Recommend genuine Apple screen replacement. Estimated labor: 45 minutes. Parts: $120. Total: $170 (plus labor $50/hr).”
What to include:
- Root cause (impact, water exposure, age, etc.)
- Impact on functionality (cosmetic only vs. critical)
- Recommended fix
- Estimated timeline and cost range
Step 6: Move to WAITING_APPROVAL
Section titled “Step 6: Move to WAITING_APPROVAL”Click “Complete Diagnostics” → Manager will build the quote → Device moves to WAITING_APPROVAL.
Note: You don’t build the quote. Front Desk or Manager does. Your job is diagnosis. Their job is pricing and customer communication.
Repair Logging: Documenting Your Work
Section titled “Repair Logging: Documenting Your Work”Once the customer approves the quote (and parts arrive, if needed), you’ll move into active repair.
Step 1: Start the Repair
Section titled “Step 1: Start the Repair”- Find your ticket in the queue
- Click “Start Repair” (or it auto-starts when moved to IN_REPAIR status)
- You now see the Repair Log form
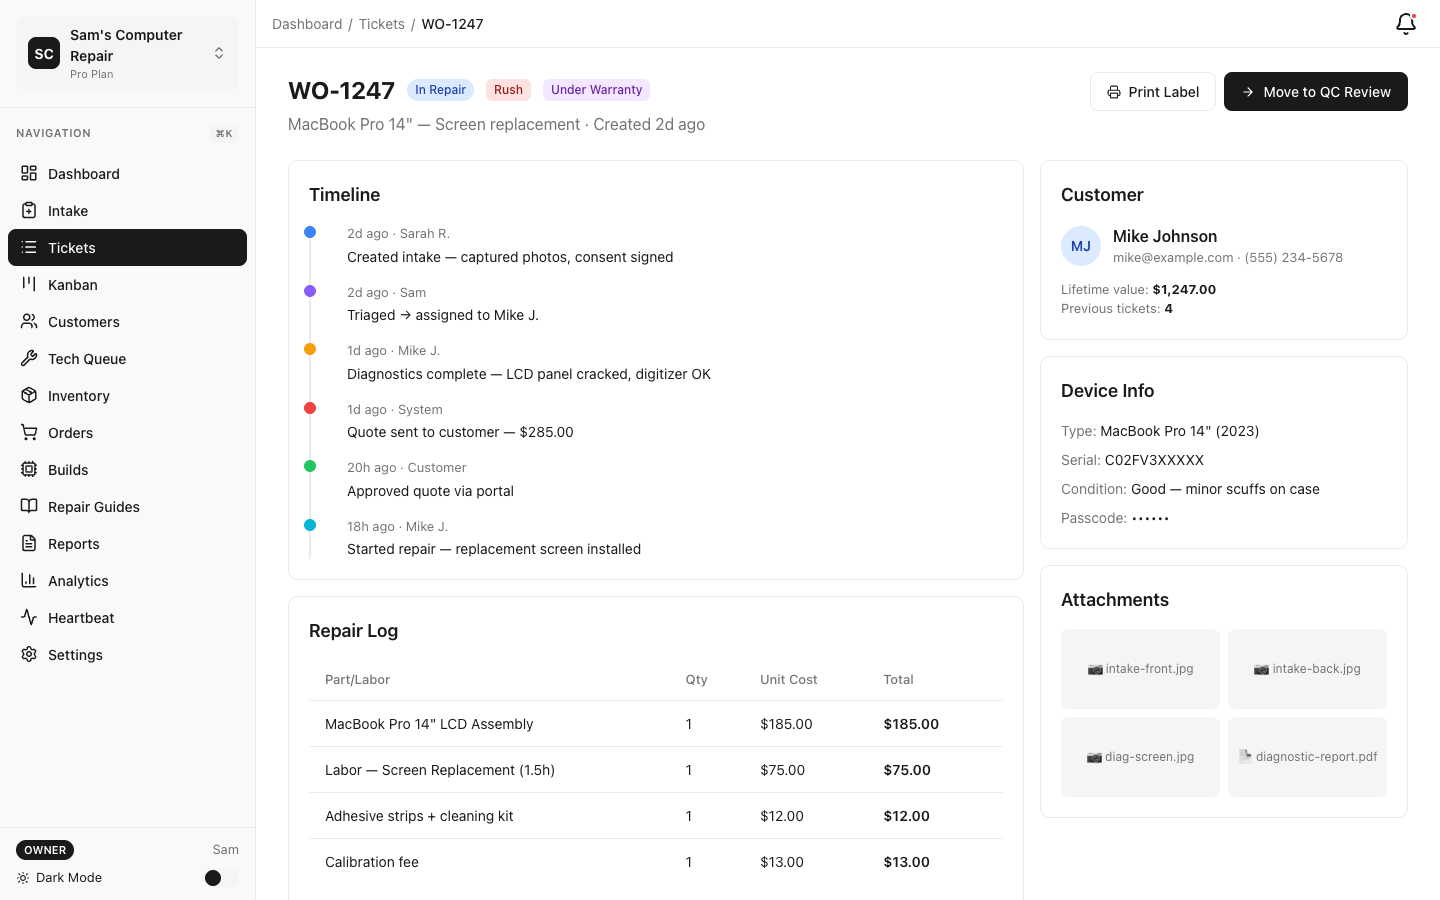
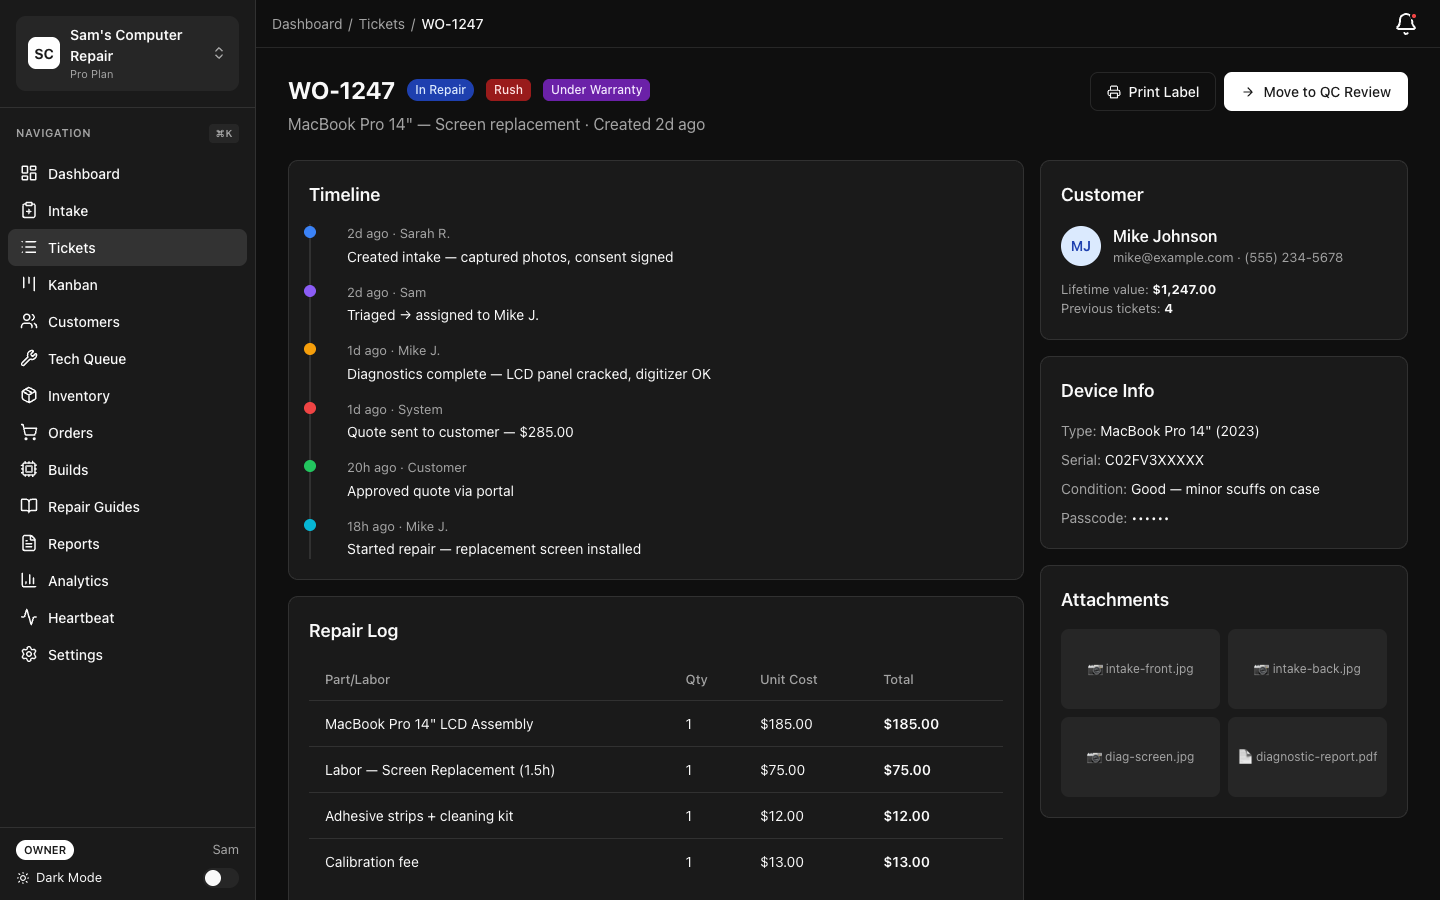
Step 2: Log Parts Used
Section titled “Step 2: Log Parts Used”As you use parts, log them:
- Click “Add Part Used”
- Search for the part (or create a new one):
- Part name: “iPhone 14 Screen”
- Quantity: 1
- Cost: $120 (from inventory)
- System auto-tracks inventory
- Repeat for each part
Examples:
- Screen replacement: 1 x $120 screen
- Battery repair: 1 x $35 battery + adhesive
- Board-level repair: Solder, components, etc.
Inventory tip: If a part isn’t in your system, ask your manager to add it. Don’t guess costs — accuracy feeds financial reports.
Step 3: Log Work Hours
Section titled “Step 3: Log Work Hours”Track time spent on this device:
- Click “Add Work Session”
- Enter:
- Start time: When you started (auto-fills with now)
- End time: When you finished (or leave blank if ongoing)
- Description: What you did (e.g., “Replaced screen, tested touchscreen, re-assembled”)
- Notes: Any complications (e.g., “Adhesive was very strong, took extra care”)
- System calculates hours and cost (based on hourly rate)
Example:
| Task | Start | End | Hours | Description |
|---|---|---|---|---|
| iPhone 14 screen replacement | 10:00 AM | 10:45 AM | 0.75 | Removed old screen, applied new adhesive, tested response |
| Testing | 10:45 AM | 11:00 AM | 0.25 | Full touchscreen test, corner sensitivity check, all good |
| Total | 1.0 |
Step 4: Add Notes Throughout
Section titled “Step 4: Add Notes Throughout”As you work, jot down notes:
- “Screen adhesive was damaged; reinforced with new adhesive”
- “Tested in sunlight — response excellent”
- “Customer requested case installation; declined, offered to recommend case brand”
These notes help QC, managers, and future-you if the device comes back.
Step 5: Complete the Repair
Section titled “Step 5: Complete the Repair”When you’re done:
- Do a final test of the device (charge it, test all functions)
- Click “Complete Repair” or “Send to QC”
- Ticket moves to QC_REVIEW — a manager or QC specialist will verify
Important: Always send to QC, even if you’re confident. QC catches issues early and is your legal protection (“I tested it and QC verified it”).
Time Tracking and Clocking In/Out
Section titled “Time Tracking and Clocking In/Out”Many shops use the Time Clock feature to track hours and attendance.
Clocking In
Section titled “Clocking In”- Start of shift: Click “Clock In” (usually on dashboard or in your profile)
- System records start time and location (if using mobile)
- You can add notes: “On-site at shop” or “Working from back bench”
Clocking Out
Section titled “Clocking Out”- End of shift: Click “Clock Out”
- System records end time, calculates hours, calculates pay (if hourly)
Manual Time Entry
Section titled “Manual Time Entry”If the clock feature isn’t used or you forgot to clock in:
- Go to Settings → Time Clock
- Click “Add Manual Entry”
- Enter start/end times
- Your manager can see and approve
Viewing Your Hours
Section titled “Viewing Your Hours”Go to My Profile → Time & Pay:
- Hours worked this week
- Hours this month
- Estimated pay (if paid hourly)
- PTO balance (if available)
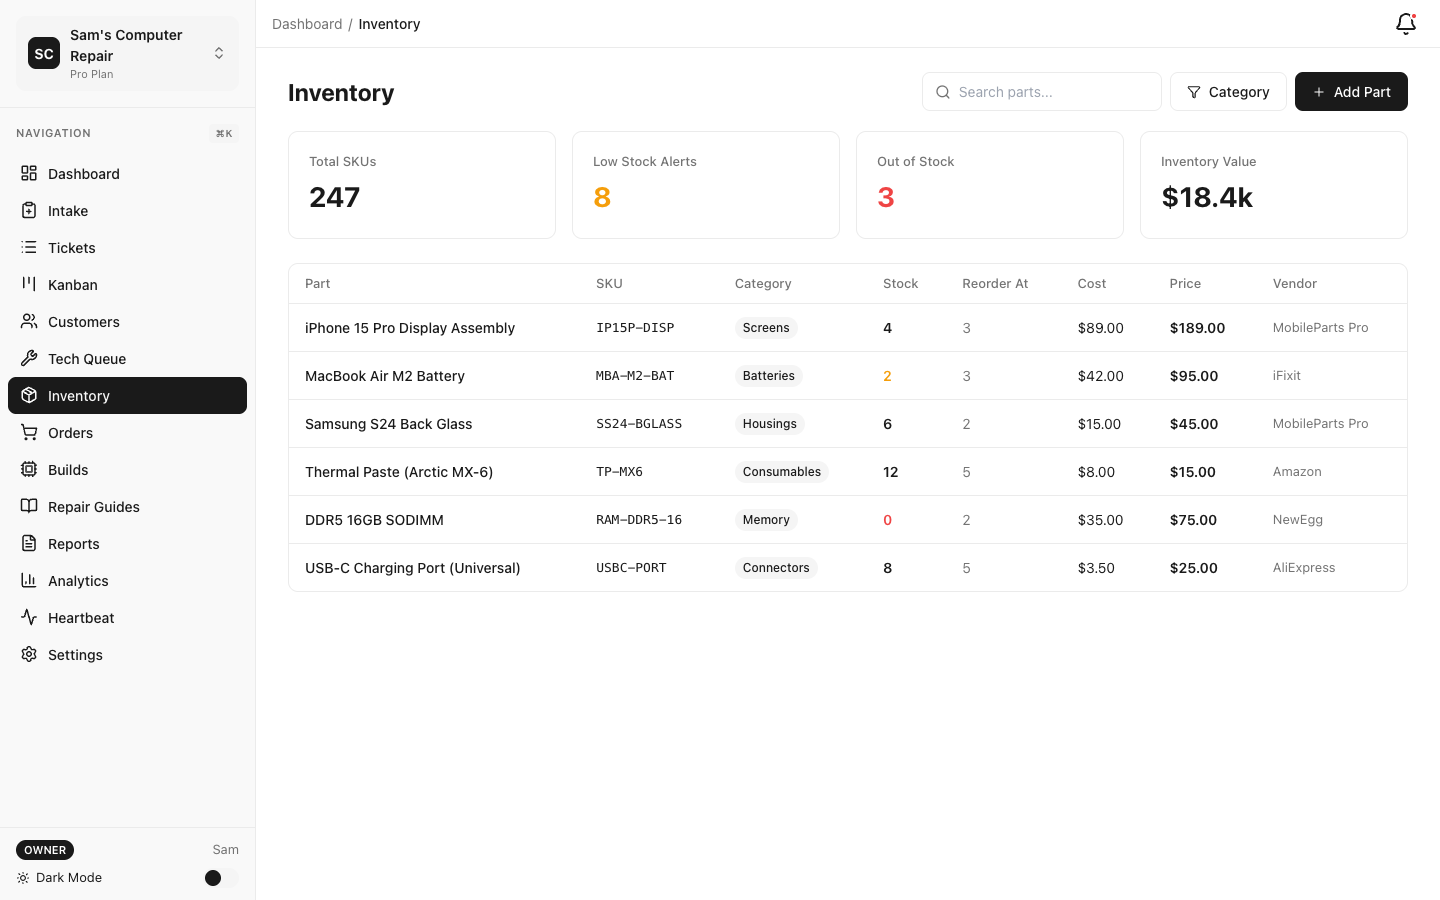
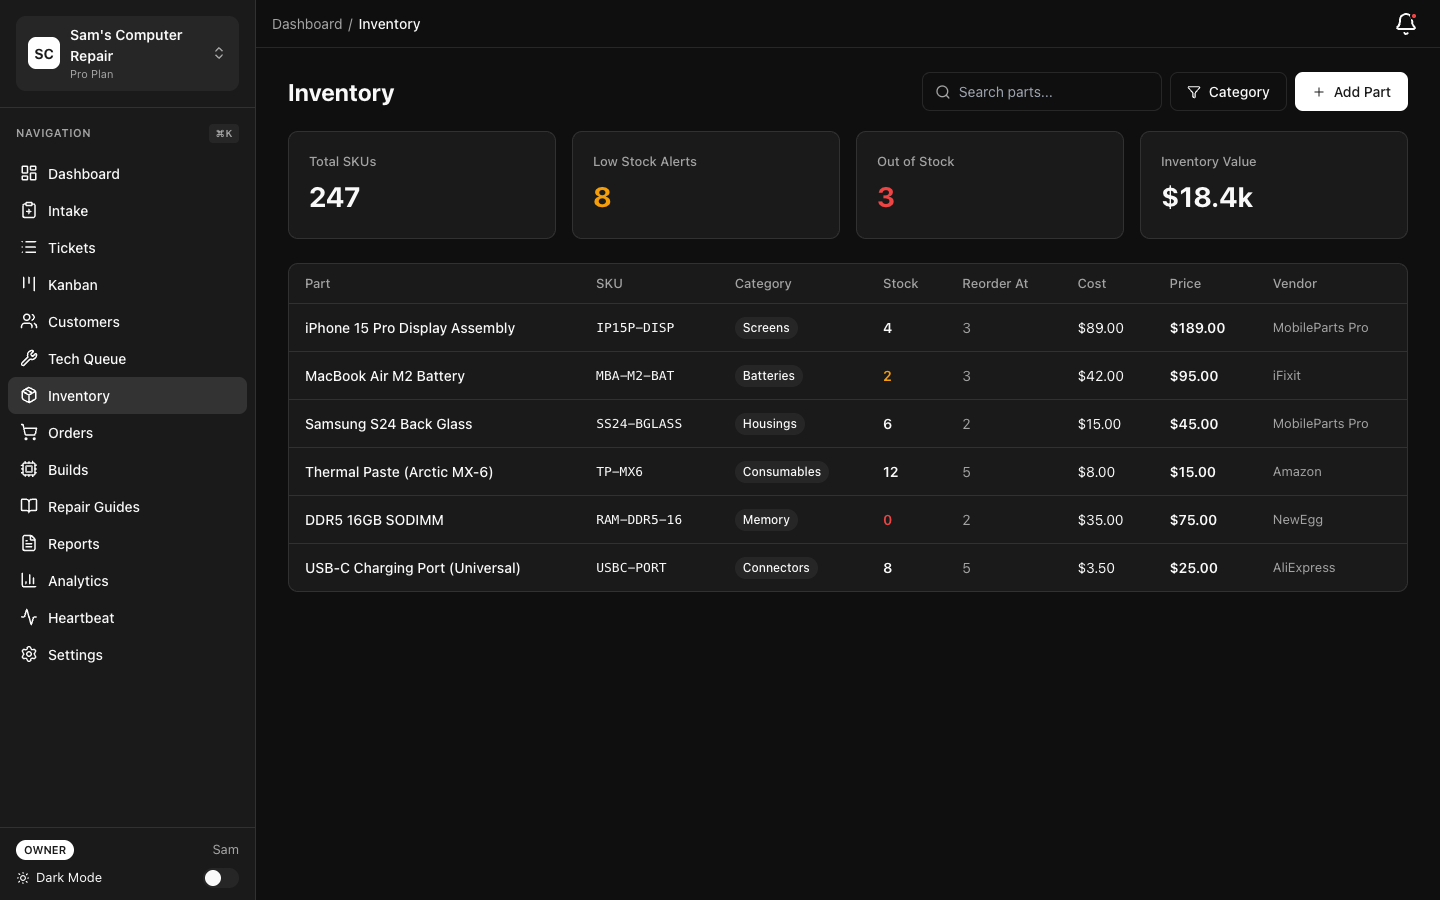
Parts Management: Requesting and Ordering
Section titled “Parts Management: Requesting and Ordering”You’ll often need parts. Here’s how to request them.
Checking Inventory
Section titled “Checking Inventory”- Go to Supplies → Inventory
- Search for a part (e.g., “iPhone 14 Screen”)
- See:
- Quantity in stock
- Reorder level (when stock is low)
- Average cost
- Supplier
If in stock, take it from inventory. If low or out of stock, request an order.
Requesting a Part
Section titled “Requesting a Part”- If a part is low/out of stock, click “Request Order”
- System sends a notification to your manager
- Manager orders from vendor
- When it arrives, it’s added back to inventory
Special Orders (Not in Inventory)
Section titled “Special Orders (Not in Inventory)”If a customer needs a rare part:
- Click “Request New Part”
- Provide:
- Part name (e.g., “Rare 2019 MacBook Pro logic board”)
- Supplier (if you know one)
- Estimated cost
- Urgency (standard, rush, etc.)
- Manager will source and quote to customer
Pro Tip: Don’t spec a part before asking the customer if they want to pay for it. Rare parts can be expensive. Manager builds the quote; customer approves.
Your Dashboard and KPIs
Section titled “Your Dashboard and KPIs”RepairOps tracks your performance. Check it regularly to stay on track.
Key Metrics
Section titled “Key Metrics”Go to Dashboard → My Stats:
| Metric | What It Means |
|---|---|
| Tickets Completed This Week | How many repairs you’ve finished |
| Avg Repair Time | Average hours per device (track improvement) |
| On-Time Rate | % of devices finished by target date |
| Rework Rate | How many times QC failed a device (lower is better) |
| Parts Waste | $ of parts damaged/wasted (minimize this) |
| Hours Logged | Total work hours (verify accuracy) |
Achievements & Badges
Section titled “Achievements & Badges”Earn badges for milestones:
- 100 Repairs — Silver badge
- 0% rework rate (10+ tickets) — Quality champion
- Perfect attendance — Gold badge
- Fastest iPhone repair — Speed demon
These are fun, not competitive. No toxic leaderboards here — it’s about personal improvement.
Troubleshooting During Repair
Section titled “Troubleshooting During Repair”Device Won’t Power On
Section titled “Device Won’t Power On”- Try charging for 30 minutes
- Check for liquid damage indicators (red = water exposure)
- If still won’t power on, note it in findings: “Device unresponsive to charging; suspected deep discharge or board-level issue. Recommend diagnostics by certified technician.”
- Alert your manager — this might be a higher-tier repair
Customer Changed Their Mind
Section titled “Customer Changed Their Mind”- Manager will contact you if customer cancels
- If repair hasn’t started: Return device, void ticket
- If repair has started: Manager negotiates with customer (refund, partial credit, etc.)
- You focus on your next ticket
You Discover Additional Damage
Section titled “You Discover Additional Damage”- Stop work
- Alert your manager: “Found liquid damage inside the case. Original quote was just screen. Recommend customer approval for additional diagnostics.”
- Manager will update customer and quote
- Wait for approval before continuing
Parts Arrived Damaged
Section titled “Parts Arrived Damaged”- Check-in at receiving and note: “Screen arrived with cracked corner. Refuse shipment.”
- Notify your manager
- Manager coordinates with vendor for replacement
- Mark the ticket with a note: “Waiting for parts replacement”
Quality Tips for QC Success
Section titled “Quality Tips for QC Success”Here’s how to avoid QC failures (rework):
-
Test before sending to QC. Power on, test all buttons, check speakers, run apps, test display. Take 5 minutes.
-
Clean the device. Remove dust, fingerprints, temporary labels. It shows you care.
-
Document everything. Photos before, during, and after. QC will ask “Did you test this?”
-
Use genuine parts when possible. Cheap screens often fail QC. Ask your manager.
-
Follow assembly guides. Cables in wrong spots = QC fail. Take time, don’t rush.
-
Document deviations. If you had to improvise, note it: “Original screw was stripped; used larger diameter screw instead.” Transparency helps.
-
Don’t cut corners. That final 5-minute test isn’t optional. It catches 80% of issues before QC.
Working with Your Manager
Section titled “Working with Your Manager”Your manager is your support and dispatcher.
Use them for:
- Unclear diagnostics (ask before guessing)
- Parts sourcing (let them handle vendor calls)
- Difficult repairs (second opinion)
- Customer communication (they’ll relay changes)
- Conflict resolution (if a customer disputes a repair)
Keep them updated:
- Close your queue items when done
- Leave notes in tickets if there’s anything they should know
- Flag urgent items (e.g., “Customer coming back at 3 PM”)
- Report inventory issues (running low on screens)
Best Practices
Section titled “Best Practices”-
One device at a time. Start to finish before moving to the next.
-
Organize your workspace. Parts, tools, and the device should be within arm’s reach.
-
Use manufacturer guides when available. Apple repair guides, iFixit, YouTube — they’re your friends.
-
Take breaks between intense work. Fresh eyes catch mistakes.
-
Keep detailed notes. Future-you will thank you if the device comes back.
-
Photo + document every repair. Evidence is your protection.
-
Test thoroughly. Don’t be the person who ships a device that fails one day later.
-
Ask questions. If you don’t know how to repair something, ask before guessing.
-
Log time honestly. Don’t pad hours or skimp. Accurate logs help your manager and your shop’s finances.
-
Respect the device. It’s someone’s property and livelihood. Treat it with care.
Quick Reference: Workflow Steps
Section titled “Quick Reference: Workflow Steps”1. Check My Queue → Sort by priority2. Select a ticket → Click "Start" or "Open"3. Run Diagnostics → Use checklist, take photos, document findings4. Complete Diagnostics → Move to WAITING_APPROVAL (manager builds quote)5. Approve Received → Ticket moves to APPROVED or WAITING_ON_PARTS6. Start Repair → Log parts, log work sessions, take notes7. Test Device → Power on, test all functions8. Send to QC → Ticket moves to QC_REVIEW9. (If QC Pass) Done! → Move to next ticket10. (If QC Fail) Rework → Fix issues, send back to QCSupport
Section titled “Support”- Not sure how to repair something? Ask your manager or check the Knowledge Base
- Confused about diagnostics? Re-read the “Diagnostics” section or ask a senior tech
- Questions about inventory/parts? Ask your manager
- Need to clock in/out? See “Time Tracking” section or ask manager
Version: 1.0.0 Last Updated: March 2026 Role: Technicians, Diagnostics Specialists, Field Service Reps