System Builder
System Builder enables your shop to design, quote, and sell custom computer systems to customers. With AI-assisted component selection, 31K+ components at your fingertips, and compatibility checking built-in, your team can create professional builds quickly.
Getting Started
Section titled “Getting Started”System Builder is available on all tiers (Starter, Pro, Enterprise). Advanced features like AI-assisted build generation require an AI add-on or Enterprise AI.
Navigate to Shop → System Builder to access:
- Create Build — Start a new custom system
- My Builds — Draft and completed builds
- Curated Catalog — Admin-managed templates and popular builds
- Templates — Predefined build patterns by use case
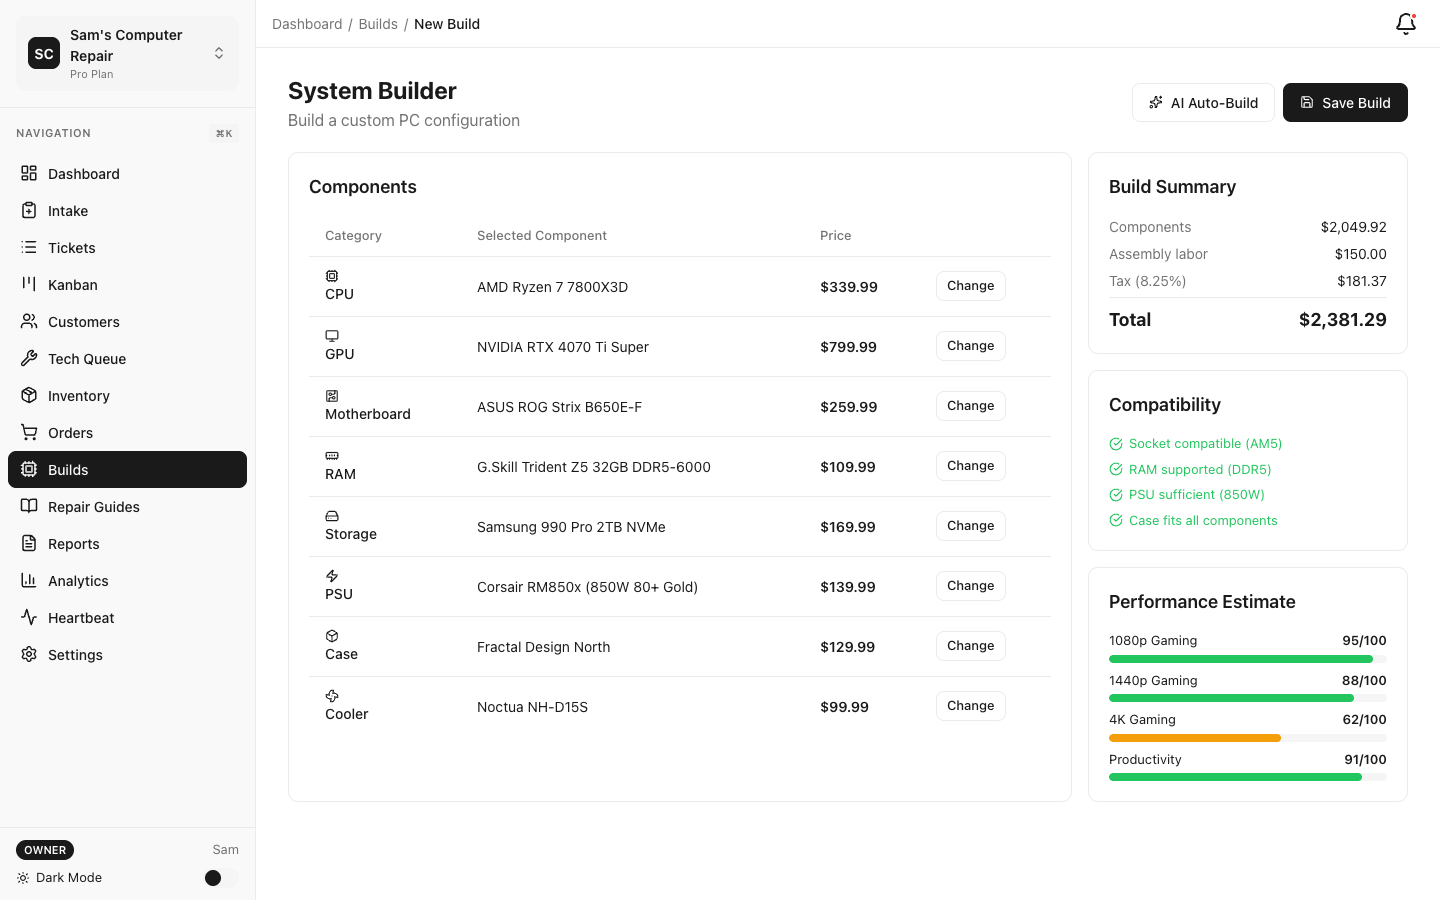
Creating a Custom Build
Section titled “Creating a Custom Build”Manual Build Creation
Section titled “Manual Build Creation”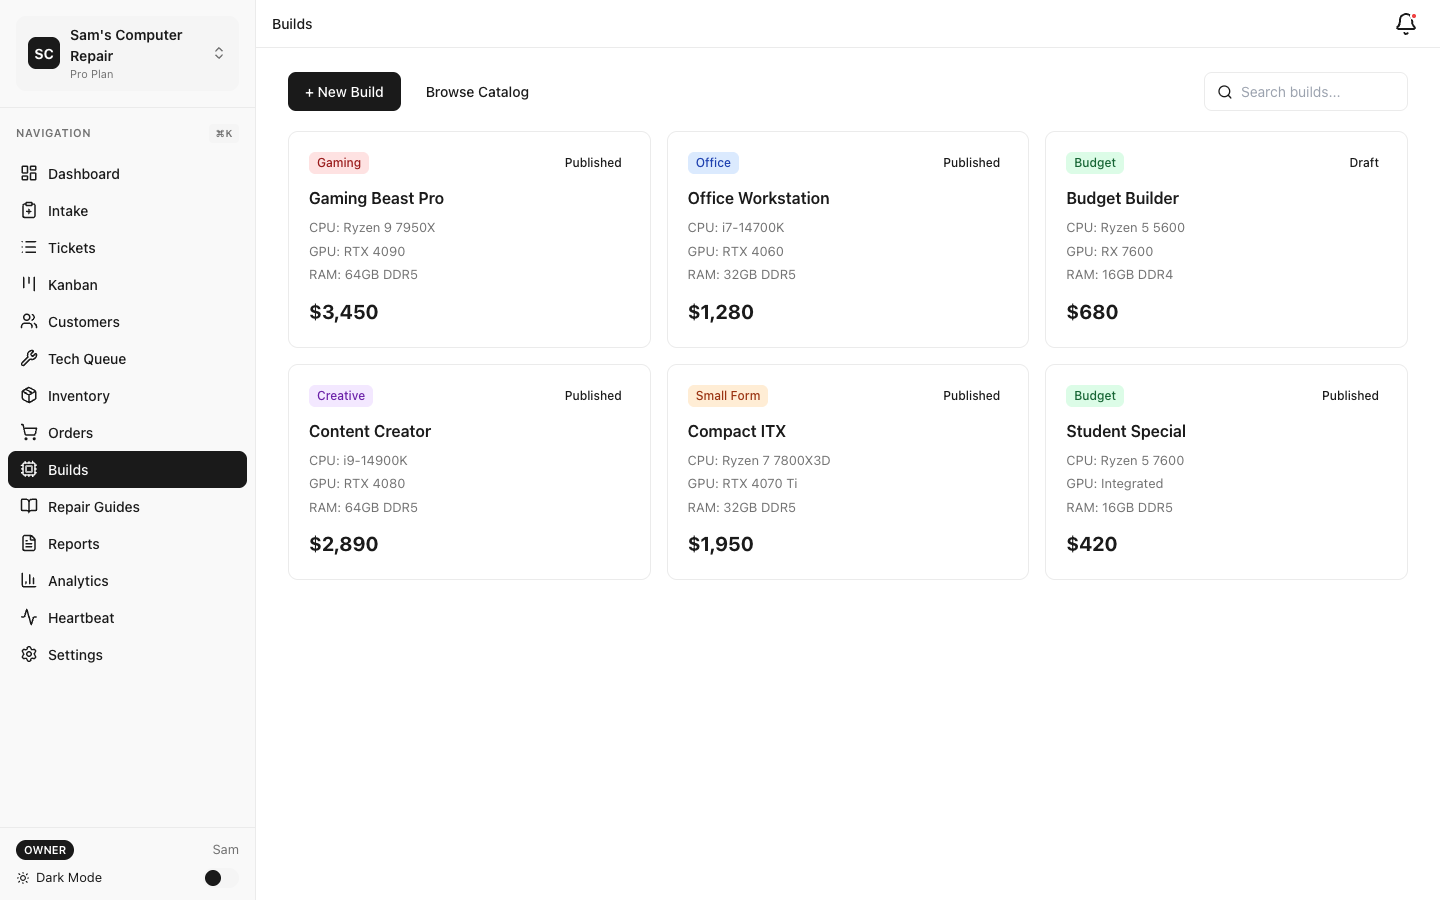
To manually select components:
- Click Create Build
- Select a Use Case (optional): Gaming, Workstation, Server, Budget, Streaming, etc.
- Enter a Build Name (e.g., “RTX 4080 Gaming Rig”)
- Add components by category:
- Processor (CPU)
- Motherboard
- Memory (RAM)
- Storage (SSD/HDD)
- Graphics Card (GPU)
- Power Supply (PSU)
- Case
- Cooling
- Peripherals (monitor, keyboard, mouse)
Component Selection
Section titled “Component Selection”When adding a component:
- Click Add [Component Type]
- Search by name, brand, or model number (e.g., “RTX 4080”, “Ryzen 7 5800X”)
- View full specs: socket, TDP, memory type, form factor, storage interface
- Compare prices across sources (if available)
- Click Add to Build to select the component
Component Database: The database includes 31K+ components from BuildCores, updated weekly with:
- New product releases
- Pricing updates
- Stock status
- Availability by region
Component Compatibility Checking
Section titled “Component Compatibility Checking”RepairOps validates compatibility automatically:
| Check | Details |
|---|---|
| Socket Compatibility | CPU socket must match motherboard socket |
| Memory Type | RAM DDR version (DDR4/DDR5) must match motherboard |
| Form Factor | Case must fit motherboard size (ATX, Micro-ATX, Mini-ITX) |
| Power Supply | PSU wattage must exceed estimated system power draw (with 30% headroom) |
| Storage Interface | SSD/HDD interface must match available slots |
| Cooling Clearance | CPU cooler height must fit case |
| Connector Availability | Sufficient USB/PCIe slots for all peripherals |
Incompatibilities appear as warnings (yellow) or errors (red):
- Warnings — Non-critical issues (e.g., RGB fans without RGB header)
- Errors — Blocking issues preventing system assembly
Fix errors before saving or sharing the build.
AI-Assisted Build Generation
Section titled “AI-Assisted Build Generation”With an AI add-on or Enterprise AI, use AI to automatically generate builds:
- Click Generate with AI
- Select Use Case (Gaming, Workstation, etc.)
- Set Budget (e.g., $2,500)
- Optionally specify preferences:
- Brand preferences (Intel vs AMD, NVIDIA vs AMD GPU)
- Performance tier (budget, mid-range, high-end)
- Special requirements (quiet, compact, quiet, etc.)
- Click Generate
AI generates 3 build options ranked by value. Review specs and compatibility, then select your preferred option or manually adjust components.
AI generation uses your configured provider (OpenAI, Anthropic, Google, Groq, or Mistral) and deducts credits from your AI budget.
Build Management
Section titled “Build Management”Viewing & Editing Builds
Section titled “Viewing & Editing Builds”Your drafts and completed builds appear in My Builds. For each build you can:
- View Details — See component list, specs, power usage, estimated cost
- Edit — Modify components, swap parts, adjust quantities
- Share — Generate a customer-facing link (portal view)
- Save as Template — Turn this build into a reusable template
- Duplicate — Copy this build as a starting point for a similar system
- Export — Download as PDF with component list and prices
- Delete — Remove the build
Build Specifications
Section titled “Build Specifications”Every build shows:
- Total Cost — Sum of component prices (may be out-of-date; confirm with vendors)
- Estimated Power Usage — Calculated system wattage (CPU TDP + GPU TDP + overhead)
- Performance Tier — Estimated gaming/workstation performance category
- Component Count — Number of parts in the build
- Compatibility Status — Pass/warnings/errors
Sharing with Customers
Section titled “Sharing with Customers”Generate a customer-facing build link:
- Click Share on the build
- Select expiration (7 days, 30 days, never)
- Copy the portal link
- Send to customer via email
Customers can:
- View the complete build with photos and specs
- See total cost and expected performance
- Request modifications (reply to the shared build)
- Approve the build (creates a repair ticket)
Customers can access shared builds from the Customer Portal without logging in.
Curated Builds Catalog
Section titled “Curated Builds Catalog”The Curated Builds Catalog is a marketplace of pre-approved, popular builds managed by admins:
- Browse by category — Gaming, Workstations, Streaming, Office, Budget
- Filter by price range — $500–$1000, $1000–$2000, $2000+
- View specs and reviews — See customer feedback and use cases
- Add to My Builds — Duplicate a curated build to customize for a customer
Managing Curated Builds (Admin Only)
Section titled “Managing Curated Builds (Admin Only)”Organization owners and managers can:
- Navigate to Shop → System Builder → Manage Curated Catalog
- Click Add Curated Build
- Either create new or select an existing build to promote
- Add a description (use case, highlights, target audience)
- Set featured status (appears at top of catalog)
- Save
Curated builds help customers discover popular options and speed up the sales process.
Templates
Section titled “Templates”Build Templates are predefined patterns for common use cases:
Default Templates
Section titled “Default Templates”- Gaming (budget, mid-range, high-end)
- Workstations (CAD, video editing, 3D rendering)
- Streaming (single-GPU, multi-GPU)
- Servers (quiet, cost-optimized, performance)
- Office (silent, space-saving)
Creating Custom Templates
Section titled “Creating Custom Templates”- Complete a build you’re satisfied with
- Click Save as Template
- Enter a template name (e.g., “1440p Streaming Rig”)
- Write a description for your team
- Save
Templates are shop-wide; all team members can access them. Use templates to standardize builds and speed up quoting.
Shop Inventory Integration
Section titled “Shop Inventory Integration”Link builds to your shop’s parts inventory:
- Navigate to Inventory → Settings
- Enable System Builder Integration
- Map your part SKUs to BuildCores components
- RepairOps automatically flags when selected components are in stock
This is useful if you maintain a pre-built parts inventory. Customers can see at-a-glance which builds you can assemble immediately.
Affiliate Configuration
Section titled “Affiliate Configuration”If you’re an affiliate for retailers (Amazon Associates, Newegg Affiliate, etc.):
- Navigate to Shop → System Builder → Affiliate Settings
- Enter your affiliate IDs for supported retailers
- When generating build links, component prices include your affiliate markup
- Track affiliate revenue in the dashboard
RepairOps currently supports:
- Amazon Associates
- Newegg Affiliate
- Curry’s Electronics (Currys)
Contact support for additional affiliate programs.
Tier Availability
Section titled “Tier Availability”| Feature | Starter | Pro | Enterprise |
|---|---|---|---|
| Create custom builds | ✓ | ✓ | ✓ |
| Component selection (31K+ DB) | ✓ | ✓ | ✓ |
| Compatibility checking | ✓ | ✓ | ✓ |
| Manual part selection | ✓ | ✓ | ✓ |
| AI-assisted generation (with AI add-on) | ✓* | ✓* | ✓* |
| Build templates | ✓ | ✓ | ✓ |
| Share with customers | ✓ | ✓ | ✓ |
| Curated catalog (browse) | ✓ | ✓ | ✓ |
| Manage curated catalog (admin) | — | — | ✓ |
| Affiliate program integration | ✓ | ✓ | ✓ |
| Inventory integration | — | ✓ | ✓ |
*Requires an AI add-on or Enterprise AI
Related Features
Section titled “Related Features”- AI Gateway — Configure AI provider for build generation
- Analytics — Track build sales and customer preferences
- Customer Portal — Share builds and collect customer approval